Showing posts with label photography. Show all posts

Tuesday, 29 March 2016

21st Century Photosniper — improved shutter release

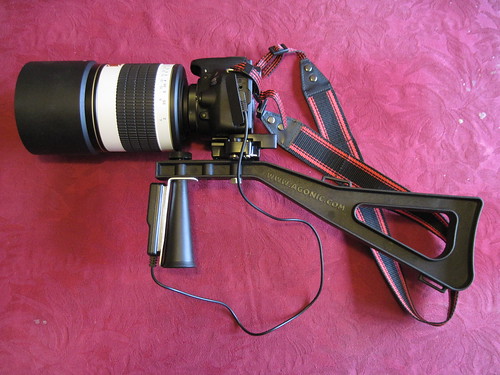
In a previous post (21st Century Photosniper) I described various additions I made to a "Stedi Stock" shoulder brace camera mount. These include a remote shutter release cable to allow the camera to be operated while holding the shoulder brace by its handle.

The commercial cable release I used contains a single switch, so there is no "half pressed" focus confirmation like you get with the camera's shutter release button. Commercial two-stage push switches are uncommon and quite expensive, so I decided to make my own.

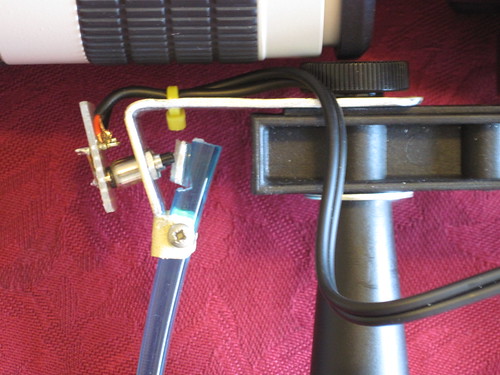
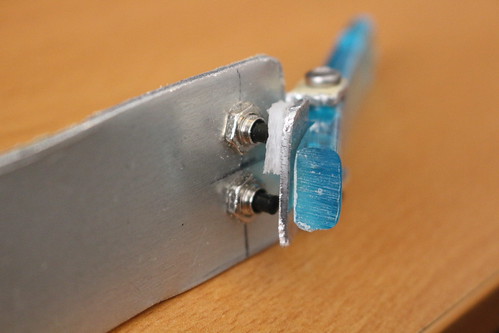
Two stage trigger switch

I used two sub-miniature push buttons operated by a trigger made from an old toothbrush handle. A small piece of plastic foam pushes one of the buttons first, then compresses to allow the other button to be pressed. The picture above shows it during construction, before bending the aluminium mounting plate to fit the shoulder brace.

Stedi Stock camera shoulder brace

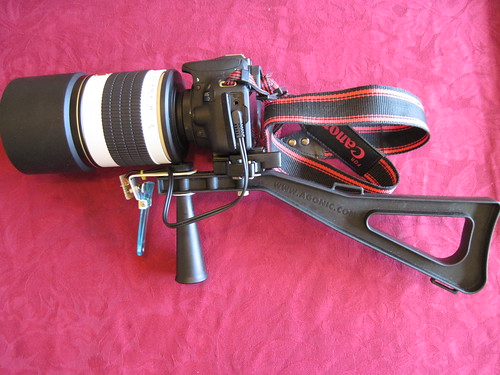
A cheap audio cable with a 2.5mm right-angled jack plug is used to connect the switches to the camera. As shown below, there is just enough room beneath my 500mm mirror lens to accommodate the thickness of the mounting plate.

Stedi Stock camera shoulder brace

I haven't yet decided if the trigger needs to be shorter. There's plenty of room behind it for the rest of my fingers when using my index finger to operate it.

Saturday, 6 February 2016

21st Century Photosniper

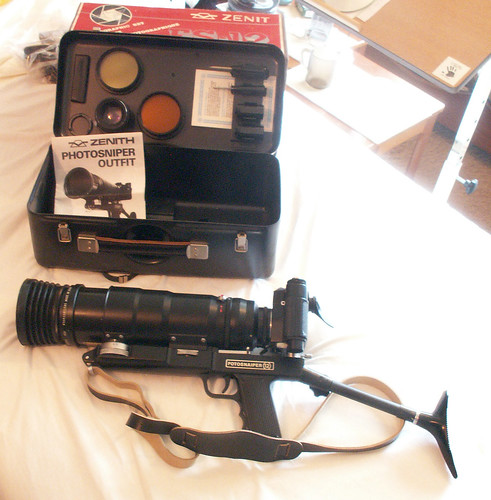
I bought my first "proper" camera, a Zenith E, in the late 1970s. At that time I would gaze enviously at adverts for the KMZ Photosniper outfit, a long lensed SLR mounted on a rifle-like shoulder brace.

Zenit Photosniper FS12
Photograph ©Patrick Stacey

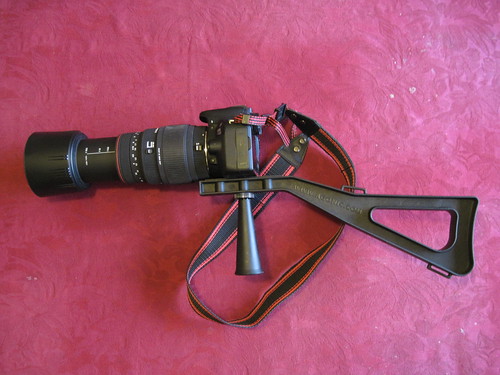
I recently happened across the Stedi Stock shoulder brace, designed for use with cameras, telescopes and other optical devices. I bought one from a UK supplier and have since been adapting it to my needs.

The Stedi Stock has a choice of three positions to mount a camera or other device with a standard ¼" tripod screw fitting. With my Canon EOS 100D, and I expect any other SLR, only the rearmost hole allows you to use the camera's optical viewfinder comfortably. Unfortunately the Stedi Stock then gets in the way of some lenses when used with a small bodied camera.

Stedi Stock camera shoulder brace

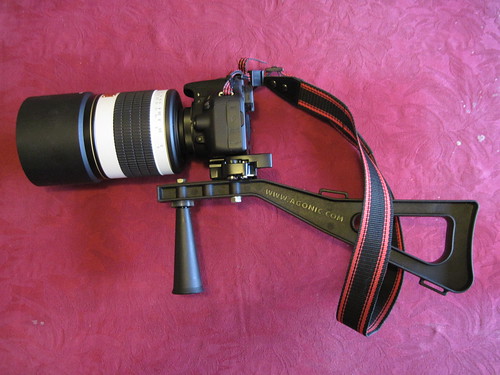
I've cured this problem by attaching the camera via a Chinese copy of a Manfrotto 323 quick release plate. This raises the camera by about 22 mm which allows use of my fattest lens (a 500mm Samyang mirror lens) and also brings the viewfinder closer to my eye. I've also moved the Stedi Stock's handle to the foremost hole to give better balance.

Stedi Stock camera shoulder brace

As supplied the Stedi Stock's most obvious omission is any way to operate the camera's shutter release. This means you have to hold the Stedi Stock's handle in your left hand while operating the shutter with the right. This is definitely more steady than using the camera hand held, but you can't adjust the lens zoom or focus with your left hand.

Some years ago I bought an "Adidt M1 remote cord" which I've never made much use of. It's just the right size to attach to the Stedi Stock's handle to make a larger "pistol grip". The button is not as easy to use as a trigger would be, but it's OK. I made a simple L-shaped bracket from aluminium sheet and attached the shutter release with hook-and-loop tape. The short arm of the "L" has a ¼" hole so it can be threaded over the Stedi Stock's handle fixing bolt.

Stedi Stock camera shoulder brace

I've not yet tried taking any photographs with this set up, so there may be further tweaks in future. I am slightly worried that it may cause unrest if used in public, as some people seem unable to tell the different between a photographer and a terrorist. However, I assume I'll be OK on a nature reserve or bird sanctuary.

Update: 3rd March 2016


I've been using the 500mm mirror lens set up to photograph birds in my garden and I definitely need a better trigger arrangement with a "half press" position to confirm focus. It could also do with being a bit more comfortable. [See 21st Century Photosniper — improved shutter release for an update on this.]

Tuesday, 26 January 2016

Correcting vignetting in digital photographs — software

In a previous blog post I outlined how I correct vignetting in digital photographs. In this post I will describe in more detail the software I've written to do this. The corrector is part of my Pyctools project and you can download example scripts that use it from my Pyctools-demo project.

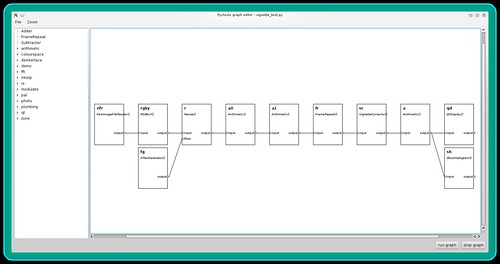
The picture below shows the component network used to determine the vignette correction parameters for a particular lens. (Click on the image to view the full resolution version on Flickr.) It requires a photograph of an evenly illuminated plain surface such as a grey card.

Vignette correction screen grab

The network contains the following components (from left to right):
  1. RawImageFileReader() — reads the grey image file. This is set to output linear data, i.e. no gamma correction is applied. (If the grey image is not a raw file then an inverse gamma corrector is needed between the file reader and the next component.)
  2. RGBtoY() — converts the RGB image to luminance.
  3. Resize() — reduces the image size to fit on the computer screen.
  4. Arithmetic() — averages the image with its horizontal reflection.
  5. Arithmetic() — averages the image with its vertical reflection. These two stages reduce the effect of uneven illumination in the original photograph.
  6. FrameRepeat() — converts the still to a video sequence. This allows the vignette corrector parameters to be adjusted "live", with near instant effect on the displayed image and histogram.
  7. VignetteCorrector() — applies the radially varying gain.
  8. Arithmetic() — boosts the image contrast. This makes any residual vignetting easier to see.
  9. QtDisplay() — shows the video. The frame rate is set to 5Hz, as this is fast enough to give feedback as the parameters are adjusted.
  10. ShowHistogram() — shows the video's histogram. This helps when adjusting the contrast boost.

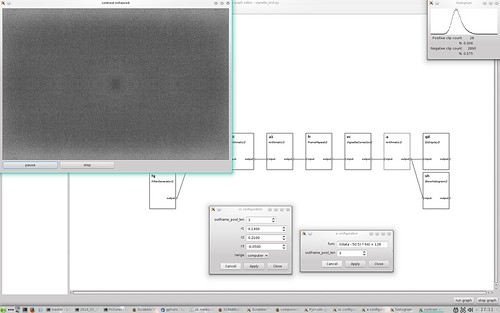
Before running the network I open the configuration dialogs of the vignette corrector and contrast booster. This allows these components to be adjusted while the graph is running, as shown below.

Vignette correction screen grab

The top left window shows the image after vignette correction, with a contrast boost of 64x in this example. The top right window shows the histogram of this contrast enhanced image. You can see there is still some residual variation in brightness, including an interesting slight darkening at the centre. The lighter patches at top and bottom make it hard to assess the effect of small changes in the vignette corrector settings. However, I think that this result is good enough for all practical purposes.

Automatic parameter setting


Since writing the above I've written software to automate the process. It measures the average level of 50 annular bands of a grey card image, computes the gain required to correct each band, then fits a 3rd order polynomial to the gain and prints out the appropriate vignette corrector settings. The above process can then be used to check the settings.

I've also identified the cause of the slight darkening at the centre of the corrected image. Using a polynomial function does not produce a good fit at zero radius, as shown in this graph.


The blue line is the required gain computed from image data and the green line is the fitted function.

Further reading


The vignette corrector component is written in Python and uses NumPy to do all the hard work. You can view the source code on GitHub and its documentation on ReadTheDocs.org.

Example scripts to determine the corrector settings and to process photographs are also downloadable from GitHub.

Sunday, 24 January 2016

Correcting vignetting in digital photographs — introduction

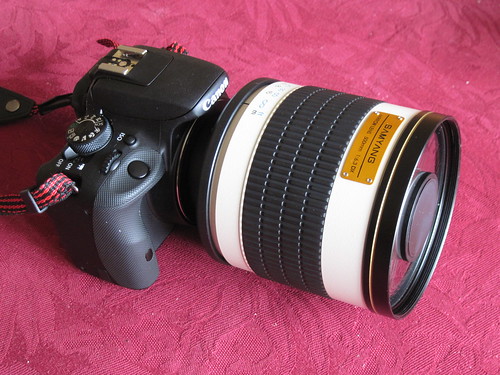
I recently purchased a budget telephoto lens for my Canon EOS 100D DSLR camera. It's a 500mm f/6.3 mirror lens, essentially a small Cassegrain telescope. Like many budget lenses it suffers from "vignetting", i.e. the edges of a photograph are darker than the centre.

500mm f/6.3 mirror lens

The EOS 100D camera has built in vignette correction (called peripheral illumination correction in the camera's menu) but this only works with Canon lenses for which the camera has data1. Also it is only applied to JPEG images, the raw image files are uncorrected. When processing raw images, or images taken with non-Canon lenses (such as a telescope), I need to apply vignette correction on my Linux computer. In my next blog post I'll describe the software I've written (as part of my Pyctools project) in more detail. This is a general introduction.

The picture below shows the vignetting problem. It's a subtle effect which may not be that visible, as the eye is very good at ignoring gradual changes in illumination. We evolved in an unevenly lit world. It is also less visible in pictures with lots of detail. A plain clear sky is probably the most testing subject. (Click on a picture to see the full size version on Flickr.)

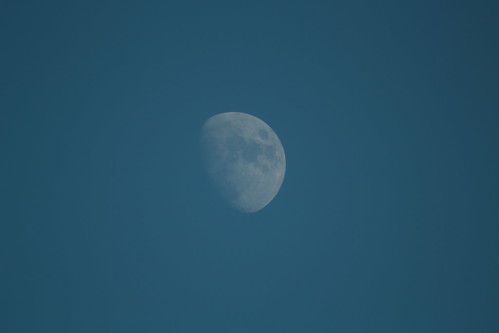
Winter daytime moon

After correction the sky is a much more even blue, as shown below. Comparing the two might make you think I've over-done the correction, but I'm fairly sure I haven't.

Winter daytime moon

Processing


The processing involved is actually quite simple. Vignetting is a reduction of light that varies with distance from the centre of the image, so correcting it requires multiplying the image pixel values by an amount that also varies with distance from the centre of the image. The tricky bit is determining how much correction to apply at each radius.

I start by photographing a plain grey card, illuminated as evenly as I can manage, using the lens (and lens settings) that I want to correct for. With my budget mirror lens or an astronomical telescope the focal length and aperture are fixed, so I just have to make sure the focus distance is correct.

Vignetting measurements

I then process the photograph with my vignette correction software and adjust its parameters until the output shows minimum radial variation. To check this I multiply the corrected image data by increasing amounts (4, 8, 16, etc.) as I get nearer the optimum settings. Eventually the unevenness of the card's illumination is the dominant factor. I can then store the vignette corrector settings, knowing they will be applicable to other pictures taken with that lens.

At this point you might be thinking what about gamma correction? The vignette correction needs to be applied to linear intensity, so should be done before the raw image data is gamma corrected for storage in JPEG or similar formats, i.e. as part of the raw image processing. In the moon examples shown above I didn't capture raw images, so I applied an inverse gamma function before correcting the vignette and then gamma correcting again.


[1] I got some odd results when I first started using the 500mm mirror lens. I'm using a T adaptor with a focus confirmation "chip" that the camera recognised as a Canon 50mm f/1.8 lens and applied that lens's correction data. I cured this problem by using Canon's software to remove all lens data from the camera except the Canon lens I have.

Wednesday, 1 May 2013

If a world famous search engine wanted some good publicity...

...they could help owners of copyright in images track down their "orphaned" works.

A hot news story in the UK in recent days has been the passing of a law to allow photographs to be published without the copyright owner's consent, provided a "diligent search" has been undertaken to find the owner. See http://www.bbc.co.uk/news/technology-22337406

Many photographers are careful to embed "metadata" within their photographs that explicitly declares the ownership of the image, but many online publishers (e.g. Facebook and the BBC) strip all such metadata from the "user generated content" they publish. This is probably excusable, since it's the only practical way to avoid the risk of obscene or libellous material being secreted in the metadata. By the way, if you're looking for an easy to use program to add metadata to your own photographs, I recommend Photini (what I wrote).

Apparently the new law makes it the photographer's responsibility to discover re-publication of his or her images and then to apply for payment from a central fund. The only problem is, how do you find out if one of your images has been re-published? I recently did a Google image search for my name, and found two instances of photographs I'd uploaded to Flickr being used without my permission. In one case the image was credited to me, in the other they'd included my name in their image file name. (In both cases, had they asked, I'd have said yes.)

With Google's huge database of Internet published images, and a bit of image processing software, they could make it much easier to find instances of an image being re-published elsewhere on the web where the perpetrator hasn't made it quite so easy to spot the theft. They already detect web pages with similar text, to reduce their pagerank on the assumption it's copied boilerplate text, so why not find very similar images in the same way? This would also help those performing a "diligent search" to find the true author of an image, rather than simply allowing them to assume it's an "orphan work".

Sunday, 23 September 2012

Editing photograph metadata

A much neglected task for any photographer is labelling one's photographs. In the old days one could write on the back of a print, but as I always preferred slide film this wasn't an option. So I created a database in which I stored a simple title and description of each slide. However, as it would often take me many months to finish a film it was sometimes unclear when and where any particular picture was taken. So I've finished up with too many slides labelled "somewhere in France".

In this age of electronic photography everything should be so much easier. There are standardised ways of storing information about the image in the image file itself. This so-called metadata is then permanently attached to the photograph. It doesn't fade or get lost when a database crashes. What's more, online services such as Flickr can use this metadata to label photographs when you upload them, saving you the trouble of writing it all again. And with photos being loaded into a computer within hours of taking them there's no excuse for forgetting any details.

On my Windows XP computer I have an easy to use metadata editing program called Microsoft Pro Photo Tools. Surprisingly Microsoft seem to have discontinued it, as there is no Windows 7 version.

The screenshot shows the key features. I load a group of images, typically one day's photos, whose thumbnails are displayed in the lower half of the GUI. After selecting one or more of the images I type metadata into the boxes in the upper half. Switching to the "map browse" tab I can drag and drop images to a map to set their location data. This really is a simple to use program that should have been more heavily promoted.

Since choosing Linux as the operating system for my main computer I've been looking for a suitable photo metadata editing program. None that I've tried has the required features. For example, some only allow you to label one picture at a time and others have a very cluttered interface that has too much technical detail. So I've decided to write my own.

As you can see, I've borrowed some of the look and feel from Photo Tools. I'm writing the software in Python, as that's what I know, and I'm using PyQt to create the GUI. Python has a very good library to read and write metadata called pyexiv2. My program is still at a very early stage of development but I'm very pleased with how it's coming along. I've even managed to load Google maps into the GUI.

My only difficulty has been in getting my head round the multiplicity of metadata standards - EXIF, IPTC and XMP. Some data, such as title or copyright info, can be stored in all three. I've decided to try and make my program follow Postel's law so it will read data from any standard and write to all three. This should maximise its compatibility with other programs.

Needless to say, when it becomes usable I'll be making it available as open source. Watch this space.

Edit 2012/09/26: early version is now available from github: http://github.com/jim-easterbrook/Photini

Tuesday, 12 May 2009

plustek OpticFilm 7300 film scanner

Slide_0038

I'm not an avid photographer, but have still managed to accumulate over 2800 35mm slides before I bought my first digital camera in September 2003. These have been sitting in a couple of shoe boxes, slowly decaying, for up to 30 years. A few weeks ago I decided to bite the bullet and transfer them to modern, indestructible, digital form.

A bit of web searching suggested there are three classes of film scanners on the market: cheap & nasty, twice the price but OK, and 30 times the price & out of my league. I soon decided against the cheap & nasty category. If I'm going to spend many hours scanning all my slides, I'd rather not have to do it twice.

The mid range in scanners appears to be dominated by plustek's OpticFilm series. After comparing the different models, I chose the OpticFilm 7300 model as it has slightly better dynamic range and is faster than the base models, and I feel I can do without the infra red dust detection of the more expensive models.

Since buying the scanner I've scanned just over 500 of my slides, starting with the very first picture I took with my Zenith E - a big, clunky, Russian made SLR I bought in 1978. I'd previously catalogued all my slides, giving each one a 4 digit number, so scanning them in order seems the most sensible way to proceed. The picture above is slide 0038, taken in my parents' garden in 1978.

Now would seem to be a good time to record some of my experiences with the slide scanner. Overall I'm quite impressed, but there are a few significant annoyances that do impede the process of scanning.

Mechanically the unit is pleasingly solid, and the slide holder grips the slides firmly while being easy to load and unload. However, when sliding the holder into the scanner it is quite difficult to stop in the right place. There are dents in the side of the holder that engage with something spring loaded inside the scanner, but the action is not nearly positive enough. Quite often the prescan shows the slide to be incorrectly positioned and a nudge is needed, followed by a repeat prescan.

Slide_0467

After the prescan, the edge of the image area has to be set. The SilverFast SEplus software supplied with the scanner has an automatic function to do this, but it quite often fails, particularly with under exposed slides or if the image contains strong straight lines near the edge. I do realise that finding the ragged edges of a scanned slide is a non-trivial image processing problem, especially as the prescan image is quite noisy, but I'm surprised at how often it fails. Even when it succeeds, it consistently treats the top and bottom edges of a slide differently, as in the example above.

What really annoys me though is that the software darkens the area outside the image frame, thus hiding any picture area that's missing. This makes manual adjustment a two stage process - drag and drop the boundary line beyond the slide edge (to undarken the image) then drag and drop it to the actual edge. I think the software should lighten the area outside the boundary to make any missed image more visible, not darken it to make it less visible. It's a diagnostic tool, not a slide show application.

After setting the image area, there are numerous controls to adjust the scan brightness, contrast, gamma, colour balance and so on. These are much more powerful than I need, but may be useful if I rescan a chosen few slides that merit extra care. These slides would probably also get the noise-reducing, time-consuming, multi-scan treatment as well. For now, I just use the auto-adjust function, occasionally choosing a different "image type" such as "evening" if it gives a better looking result.

One curiosity about the software is the choice of positive, negative, or Kodachrome film types. All the slides I've scanned so far have been Kodachrome or Ektachrome, and the Kodachrome setting has given a better colour balance than the positive setting. I haven't attempted to scan any negatives.

Having already catalogued my slides in a database application, I decided to reuse this data to label the slides. After some hours experimenting with different Python libraries to process EXIF and IPTC data I finished up with a script that seems to do the job. If you follow the link to flickr from one of the above pictures you'll see the description and tags that were automatically extracted by flickr from the image's EXIF and IPTC data.
Wednesday, 7 May 2008

The Moon and Mercury


Last night I took my first astro photos for a long time. There was a near conjunction of the Moon and the planet Mercury. I set up my Canon 350d and Sigma 70-300 zoom lens in my bedroom, pointing out through an unopenable (and dirty!) window towards a cluttered horizon.

By about half past eight it was beginning to get dark enough that I thought I might see something, but it was only at about ten to nine that the crescent Moon suddenly popped into view. I started taking pictures, one after another, playing with exposure time, focus and focal length in the hope of getting a good shot. I knew Mercury would be to the left of the Moon (thanks to the Planetarium program on my Palm PDA) and that it should fit in the field of view of a 300mm lens, but I couldn't see it in the viewfinder or with the naked eye.

Of all the pictures I took, this is the least worse. Mercury is clearly visible, and it's also the youngest new Moon I've photographed - just 1 day, 7¾ hours old.