Saturday, 6 February 2016

21st Century Photosniper

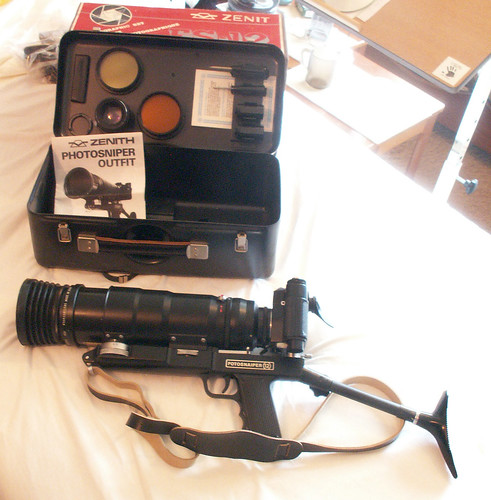
I bought my first "proper" camera, a Zenith E, in the late 1970s. At that time I would gaze enviously at adverts for the KMZ Photosniper outfit, a long lensed SLR mounted on a rifle-like shoulder brace.

Zenit Photosniper FS12
Photograph ©Patrick Stacey

I recently happened across the Stedi Stock shoulder brace, designed for use with cameras, telescopes and other optical devices. I bought one from a UK supplier and have since been adapting it to my needs.

The Stedi Stock has a choice of three positions to mount a camera or other device with a standard ¼" tripod screw fitting. With my Canon EOS 100D, and I expect any other SLR, only the rearmost hole allows you to use the camera's optical viewfinder comfortably. Unfortunately the Stedi Stock then gets in the way of some lenses when used with a small bodied camera.
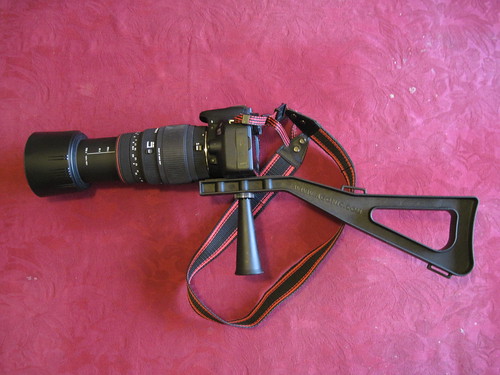
Stedi Stock camera shoulder brace

I've cured this problem by attaching the camera via a Chinese copy of a Manfrotto 323 quick release plate. This raises the camera by about 22 mm which allows use of my fattest lens (a 500mm Samyang mirror lens) and also brings the viewfinder closer to my eye. I've also moved the Stedi Stock's handle to the foremost hole to give better balance.
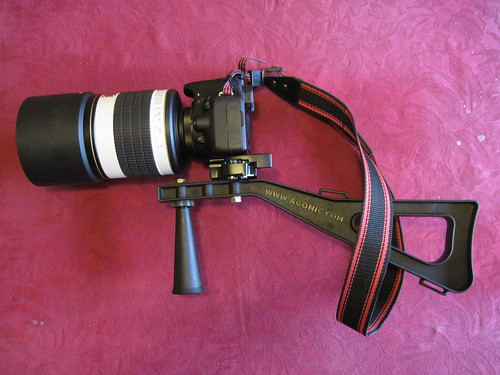
Stedi Stock camera shoulder brace

As supplied the Stedi Stock's most obvious omission is any way to operate the camera's shutter release. This means you have to hold the Stedi Stock's handle in your left hand while operating the shutter with the right. This is definitely more steady than using the camera hand held, but you can't adjust the lens zoom or focus with your left hand.

Some years ago I bought an "Adidt M1 remote cord" which I've never made much use of. It's just the right size to attach to the Stedi Stock's handle to make a larger "pistol grip". The button is not as easy to use as a trigger would be, but it's OK. I made a simple L-shaped bracket from aluminium sheet and attached the shutter release with hook-and-loop tape. The short arm of the "L" has a ¼" hole so it can be threaded over the Stedi Stock's handle fixing bolt.
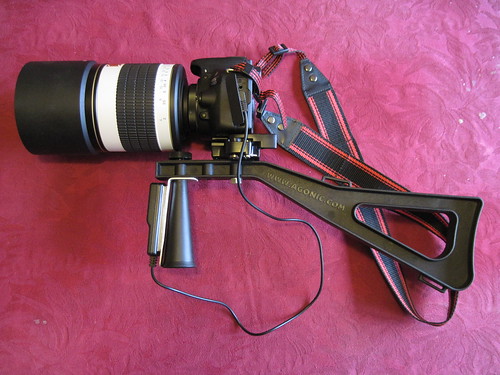
Stedi Stock camera shoulder brace

I've not yet tried taking any photographs with this set up, so there may be further tweaks in future. I am slightly worried that it may cause unrest if used in public, as some people seem unable to tell the different between a photographer and a terrorist. However, I assume I'll be OK on a nature reserve or bird sanctuary.

Update: 3rd March 2016


I've been using the 500mm mirror lens set up to photograph birds in my garden and I definitely need a better trigger arrangement with a "half press" position to confirm focus. It could also do with being a bit more comfortable. [See 21st Century Photosniper — improved shutter release for an update on this.]

Tuesday, 26 January 2016

Correcting vignetting in digital photographs — software

In a previous blog post I outlined how I correct vignetting in digital photographs. In this post I will describe in more detail the software I've written to do this. The corrector is part of my Pyctools project and you can download example scripts that use it from my Pyctools-demo project.

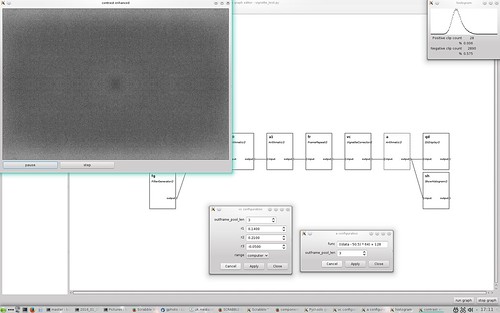
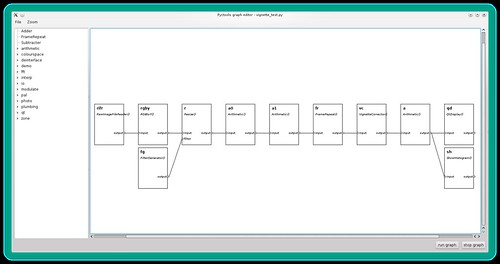
The picture below shows the component network used to determine the vignette correction parameters for a particular lens. (Click on the image to view the full resolution version on Flickr.) It requires a photograph of an evenly illuminated plain surface such as a grey card.

Vignette correction screen grab

The network contains the following components (from left to right):
  1. RawImageFileReader() — reads the grey image file. This is set to output linear data, i.e. no gamma correction is applied. (If the grey image is not a raw file then an inverse gamma corrector is needed between the file reader and the next component.)
  2. RGBtoY() — converts the RGB image to luminance.
  3. Resize() — reduces the image size to fit on the computer screen.
  4. Arithmetic() — averages the image with its horizontal reflection.
  5. Arithmetic() — averages the image with its vertical reflection. These two stages reduce the effect of uneven illumination in the original photograph.
  6. FrameRepeat() — converts the still to a video sequence. This allows the vignette corrector parameters to be adjusted "live", with near instant effect on the displayed image and histogram.
  7. VignetteCorrector() — applies the radially varying gain.
  8. Arithmetic() — boosts the image contrast. This makes any residual vignetting easier to see.
  9. QtDisplay() — shows the video. The frame rate is set to 5Hz, as this is fast enough to give feedback as the parameters are adjusted.
  10. ShowHistogram() — shows the video's histogram. This helps when adjusting the contrast boost.

Before running the network I open the configuration dialogs of the vignette corrector and contrast booster. This allows these components to be adjusted while the graph is running, as shown below.

Vignette correction screen grab

The top left window shows the image after vignette correction, with a contrast boost of 64x in this example. The top right window shows the histogram of this contrast enhanced image. You can see there is still some residual variation in brightness, including an interesting slight darkening at the centre. The lighter patches at top and bottom make it hard to assess the effect of small changes in the vignette corrector settings. However, I think that this result is good enough for all practical purposes.

Automatic parameter setting


Since writing the above I've written software to automate the process. It measures the average level of 50 annular bands of a grey card image, computes the gain required to correct each band, then fits a 3rd order polynomial to the gain and prints out the appropriate vignette corrector settings. The above process can then be used to check the settings.

I've also identified the cause of the slight darkening at the centre of the corrected image. Using a polynomial function does not produce a good fit at zero radius, as shown in this graph.


The blue line is the required gain computed from image data and the green line is the fitted function.

Further reading


The vignette corrector component is written in Python and uses NumPy to do all the hard work. You can view the source code on GitHub and its documentation on ReadTheDocs.org.

Example scripts to determine the corrector settings and to process photographs are also downloadable from GitHub.

Sunday, 24 January 2016

Correcting vignetting in digital photographs — introduction

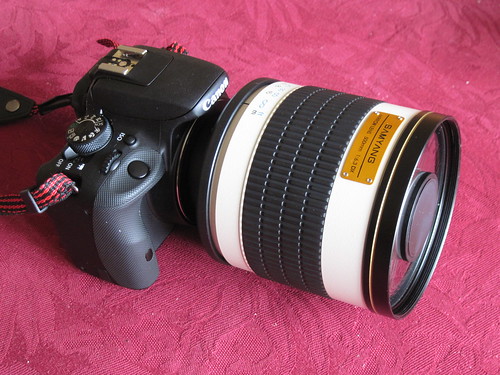
I recently purchased a budget telephoto lens for my Canon EOS 100D DSLR camera. It's a 500mm f/6.3 mirror lens, essentially a small Cassegrain telescope. Like many budget lenses it suffers from "vignetting", i.e. the edges of a photograph are darker than the centre.

500mm f/6.3 mirror lens

The EOS 100D camera has built in vignette correction (called peripheral illumination correction in the camera's menu) but this only works with Canon lenses for which the camera has data1. Also it is only applied to JPEG images, the raw image files are uncorrected. When processing raw images, or images taken with non-Canon lenses (such as a telescope), I need to apply vignette correction on my Linux computer. In my next blog post I'll describe the software I've written (as part of my Pyctools project) in more detail. This is a general introduction.

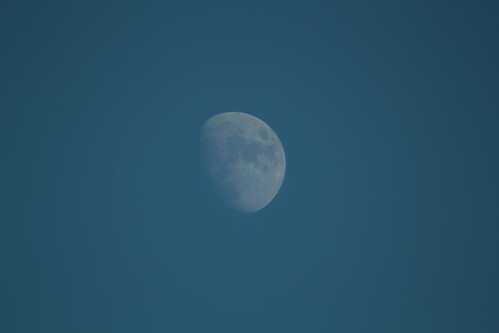
The picture below shows the vignetting problem. It's a subtle effect which may not be that visible, as the eye is very good at ignoring gradual changes in illumination. We evolved in an unevenly lit world. It is also less visible in pictures with lots of detail. A plain clear sky is probably the most testing subject. (Click on a picture to see the full size version on Flickr.)

Winter daytime moon

After correction the sky is a much more even blue, as shown below. Comparing the two might make you think I've over-done the correction, but I'm fairly sure I haven't.

Winter daytime moon

Processing


The processing involved is actually quite simple. Vignetting is a reduction of light that varies with distance from the centre of the image, so correcting it requires multiplying the image pixel values by an amount that also varies with distance from the centre of the image. The tricky bit is determining how much correction to apply at each radius.

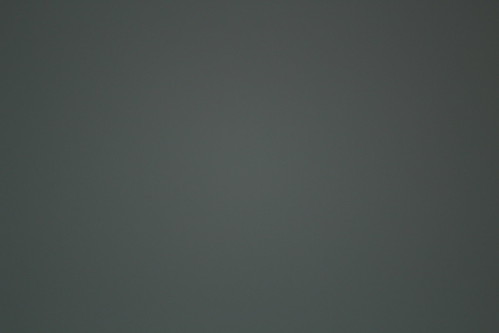
I start by photographing a plain grey card, illuminated as evenly as I can manage, using the lens (and lens settings) that I want to correct for. With my budget mirror lens or an astronomical telescope the focal length and aperture are fixed, so I just have to make sure the focus distance is correct.

Vignetting measurements

I then process the photograph with my vignette correction software and adjust its parameters until the output shows minimum radial variation. To check this I multiply the corrected image data by increasing amounts (4, 8, 16, etc.) as I get nearer the optimum settings. Eventually the unevenness of the card's illumination is the dominant factor. I can then store the vignette corrector settings, knowing they will be applicable to other pictures taken with that lens.

At this point you might be thinking what about gamma correction? The vignette correction needs to be applied to linear intensity, so should be done before the raw image data is gamma corrected for storage in JPEG or similar formats, i.e. as part of the raw image processing. In the moon examples shown above I didn't capture raw images, so I applied an inverse gamma function before correcting the vignette and then gamma correcting again.


[1] I got some odd results when I first started using the 500mm mirror lens. I'm using a T adaptor with a focus confirmation "chip" that the camera recognised as a Canon 50mm f/1.8 lens and applied that lens's correction data. I cured this problem by using Canon's software to remove all lens data from the camera except the Canon lens I have.↩